STO-169220 Step by Step - Setup Assembly Instructions
Watch the Video or Read and Follow along with the pictures for more detailed information.
Find a nice area to setup your screen. Grass works great also, just make sure sticks and any pointy sharp objects are cleared for assembly and use.


Layout all the parts.

Notice where the snaps are. Unfold the frame with the snaps up. For the STO-169220 unfold the frame as shown in the next steps. Be careful to support the hinges when unfolding the frame. DO NOT cause AWKWARD pressure to the hinges as it can break a hinge. If you ever do break a hinge, please contact us. Hinges are very easy to replace with a hinge kit.
For more information on replacing a hinge, click here.

Unfold the frame for the height of the screen first.


Snaps are up and the height of the screen is set.
Open up the width of the screen.

Slide the frame along the ground or keep it close to the ground while opening. This causes less awkward pressure on the hinges.


Lock all of the hinges into place.

If ever a hinge does not lock into place. Simply apply some lubricant (such as WD40) to the hinge as shown and wipe away the excess.


After the hinges are locked into place, secure the four corner latches.

Install the vertical center support bar. Notice the threaded holes on the support bar. These should be facing DOWN.

The support bar is unfolded with hinges latched. The threaded holes are facing down.

Fold the ends of the support bar up as shown keeping the rubber pads towards the frame. Then secure the support bar to the frame with the included thumb bolt.


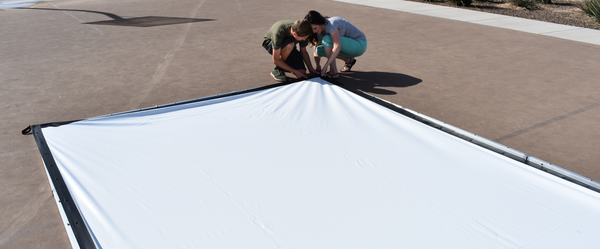
Begin by snapping the 3 corner snaps on each side of the screen and frame. Do not snap each snap as you go along because it will be hard to stretch the screen to the frame. When removing snaps, remove one snap at a time as you put the screen to the frame. Do not stand in the corner and whip the screen material off of the frame as this can damage snaps. A snap can be replaced in 10 seconds if you destroy a snap. We recommend this kit click here. Here is a video showing how.


Help each other with the third corner.

And finally the fourth corner.
Tip: If your material is ever too tight to pull. Use two people to get the last corner attached. Or to make this even easier, lay the vinyl for a few minutes with the black backing facing up towards the sun. The material will stretch much easier as the vinyl becomes more elastic when it is heated.
Tip 2: Undo the corner hinge, and one of the hinges that can fold into the center of the frame. Snap on the 3 snaps, then lock the hinge and the corner hinge again by reaching under the material.

When removing snaps, remove one snap at a time as you put the screen to the frame. Do not stand in the corner and whip the screen material off of the frame as this can damage snaps. A snap can be replaced in 10 seconds if you destroy a snap. We recommend this kit click here.
Now insert the legs into both sides the frame as shown with the groove up.

Secure both legs in place with the included thumb bolts and tighten.

Now lift the front foot on both legs and lock the hinge into place.

For the STO-169220, put the eye bolts and rope on the frame top before standing it. You will need the rope and eye bolt to stabilize the frame and make the screen stand perfectly upright.

Now the screen is ready to stand. DO NOT use the screen when there is wind. The screen will act as a giant sail as wind is very powerful it can damage the frame and cause bodily harm. If you do need extra support use the included rope and stakes.


Lock the back feet into place by locking the 90 degree hinge.

Install the center support leg using longer thumb bolts.


Attach the angled leg supports to both side legs using the longer thumb bolts.

Keep the angle support folded up to screw in the bottom thumb bolt. Make sure the rubber spacers are down against the frame.

Unfold the angled support and lock the hinge. Bolt in the top with a longer thumb bolt with the rubber spacers towards the frame.

Tip: The STO-169220 is humongous. Because of the size, you will need to use the eye bolts and ropes to help stabilize the screen frame. Pull the rope to direct the frame to the position you want it in. This will help hold the frame straight up vertically.

Tip: You can turn the black backing towards the sun to remove any fold marks in the material. For best results, leave the material in the sun for 30 minutes then move the material to a cool area. Then back into the sun then back into a cool area. As the material heats and cools it can return to its flat memory. You can roll the material next time if the fold marks bother you.
Stakes are included for a more secure tie down. Tip: You can also use the stake and rope to make the screen stand up perfectly upright by adjusting the pull of the rope. Do Not use the screen if windy. This can cause damage to the screen, surrounding property or injure someone.

48" Extension Legs are also available. Below shows a picture.
If you have any questions. Please contact us.

PACKAGING YOUR SCREEN
Take off the center leg
Unlock the back feet and lay the screen down.
Take off the legs.
Begin anywhere removing one snap at a time. Do not stand in the corner and whip the screen material off of the frame as this can damage snaps. A snap can be replaced in 10 seconds if you destroy a snap. We recommend this kit click here. Snap kit 1267. This includes the snaps for the material and the other screw end that attaches to the frame. Here is a video on how to replace snaps.
Now continue unsnapping the screen one snap at a time.
Either fold the frame or material next. We chose to fold the material.

Fold the material corner to corner and make sure it is flat.

Fold the material again and make sure the material stops at the pockets and snaps. DO NOT overlap the pockets and snaps.

Continue folding stopping before the snaps and pockets.


Now fold the material in a Z shape. With the Z shape, the material viewing surface is not over the pockets and snaps. The Z shape also helps the material fit easily into the packaging.

Hold the material to help it fold down. Hold it right before the pocket and snaps.

Notice how the material is in a Z shape. Notice how the viewing surface material does not overlap the pockets or the snaps.

Put the material in the bag and lock the hook and loop.

Put the material aside and fold the frame.
Unscrew the center support bar, fold it up and put it aside.
Be careful to support the hinges when folding the frame. DO NOT cause AWKWARD pressure to the hinges as it can break a hinge. If you ever do break a hinge, please contact us. Hinges are very easy to replace with a hinge kit.
For more information on replacing a hinge, click here.
First unlock the four corners.

Then press the hinge button to release the latch on each hinge. Fold in the top and bottom first being careful to support the hinges.


Now that the width of the frame is folded in. Fold the height of the frame to completely condense the frame.
We turned the frame on the side for ease.


Now, package the parts into the carrying bag.
First put the frame in the carrying bag.

Then the legs.

Then the center support, center leg and angled side leg supports get put on top of the frame.

The foam, stakes, ropes, eye bolts, and thumb bolts go in next.

Put the material protector, material and instruction manual on top.

Zip the bag and prepare the handle.

Carry away your screen for storage.

Thank you for purchasing a Silver Ticket Products STO-169220.